Showing posts with label baking. Show all posts

Tuesday, December 8, 2015

Making meat floss / chicken floss with a bread maker

My breadmaker has been kept in the dark till my friend told me I can make meat floss / chicken floss with it. 

My curiosity was at its peak. I loved chicken floss when I was a child and making it was out of my mind (I'd been thinking it involved sophiscated procedures). But my friend's recipe sounded sooo easy I wanted to try immediately. 

I went to the market and bought 500g of meat. Boiled it in my soup.   Then took it to the pot and boiled with some water, 1 table spoon of  sugar and 1 tablespoon of soy sauce till the meat soaked up all the liquid. I took it out and put into the breadmaker and had it run on JAM mode - twice - for a completely dry and flossy effect. 

Viola! I've healthy, no preservatives, no colouring, no flavoring meat floss at home! 
Note: errr.... It could be tasteless for adults but it's fine for kids. 󾌩

Friday, October 16, 2015

Being myself

I've watched videos on making Oreo cheesecake for more than 20 times in Youtube and frankly, I'm obsessed with the videos. I can't help clicking on new videos to watch because I think the more videos I watch, the better cake I'll make. 

First thing first, I made a trip to bakery supplies shop with the recipe in hand. And that trip cost me more than RM100! I felt like a super stupid lady because I was "conned" to buy so many other unrelated things when I knew so well what I wanted!!! 😒

Today, after much hesitation, I started to make the cake. After I've completed, I felt like a loser again, with two sinks full of dishes to wash. I wondered whether other bakers have to wash as much. It's exhausting and I felt guilty as I've neglected my darlings when I was so engrossed in doing what I wanted to do. 

While I was washing, I made a conclusion - probably I should not try to do something what others do best but do something I know best. While I always wanted to be a super-mom - being able to teach, bake, cook, clean, sew and more, I should just do what I can i.e. sing, dance and read to my children, and not forgetting the skill of writing bestowed to me by God. 

It's self-fulfillment to be able to make a cake for my children's birthday, but it's even better if I could spend more valuable time with them. I believe it's not harmful to buy a cake for them, isn't it? Leave it to the professionals for the best result since God created us with different skills and if I can't be a baker, I can still be others. Cheers! πŸ˜‰


Thursday, June 9, 2011

Baking disaster

The curiousity in me prompt me to experiment with the Brazilian cheese bread recipe today.

I wondered:
1) What makes the Brazilian cheese balls rise?

Is it the egg? the cheese? or the tapioca flour with the mixture? or the blending process itself?

2) If the Brazilian cheese balls can rise, then I can make a sponge cake rise with the same technique, right?

I tried with exactly the same ingredients minus cheese and salt; plus choc chips. And it turned out to be a disaster!

The balls rose so high that they eventually burst and showed hollow bread!

So, I added some salt to the mixture. This time the balls rose but to an extend. Still, the balls collapsed once taken out from the oven. Hmm...

A baking disaster day! Hope this didn't damper your enthusiasm in baking...
Baking is a process of trial and error itself. It's only by this that the baking industry will prosper and come out with more innovative and creative creations.

Saturday, May 21, 2011

Steamed tapioca

My friend told me that tapioca is a good food for detoxification. Whether it is true or not, it is a good snack to have.

1) Cut the tapioca into half. Then, into a quarter. You should be able to peel off the skin (shown in pic.).

2) After peeling off the skin, cut the tapioca into cubes.

3) Put to steam above boiling water for 20 to 30 minutes.

You can serve with sugar or eat it just like that.

NOTE: You may want to wear a thin glove while peeling off the tapioca skin. Or you can choose to shred off the skin with a knife rather than peeling them. My right thumb usually gets hurt due to the peeling because the tapioca skin is rather thick and rough. And my nails also got dirty which took quite some time to clean up. So, whatever choice you use to clear off the tapioca skin, be careful not to hurt yourself.

Monday, May 2, 2011

Baking for mother's day

I gave my students a baking lesson. Well, nowadays, you just won't know how much the children know. They might have seen a lot through television but they actually have no hands-on experience in cooking and baking. 

When I gave an egg to my older student, Joe, he smiled at me. His brother, Benjamin, was quick to say, "Hit the egg at the table's edge." 

Sometimes, we want the children to be "clever" and we thought that as long as they score in their exams, they are considered clever and we are relieved. But how about living skills? Are they able to be independent? Are they able to mix around well with others without getting into a fight? Do they understand that besides reading for tests, there are so many other things to read about to increase their knowledge in?

Joe definitely was not good at breaking an egg but I let him try. I can see the sense of contentment in the children as they see their own products coming out of the oven! And how proud they were when they presented the tarts to their mother! Benjamin said, "WE baked them."

Let your child try on little chores and you can see excitement in those little twinkling eyes and how proud they are to be able to help you without a 'kakak'.

Happy Mother's Day!

Friday, April 29, 2011

Banana sponge cake (without baking soda)

Thanks to Hooi Thiam for this recipe. Now, I don't need to use any self-rising flour or baking soda in baking my cake. But it took me quite some time practising until I get my cake to rise.

Pictures show process (top left to right)


Ingredient A:
3 egg yolk
9 tablespoon of flour
1 and 1/2 tablespoon of sugar
3 small bananas
55ml water
35ml vegetable oil

Ingredient B:
3 egg white
3 tablespoon sugar

1) Put bananas to blend with the water.

2) Beat the egg yolk with the sugar till they blended well.

3) Add in the rest of the ingredients in A and mix well.

4) Pic. 3 shows egg white with sugar.

5) Beat the egg white with sugar till it turns fluffy and foamy as shown in pic. 4. When you lift up the whisk, the mixture will drool down slowly and form a circle.

6) Pour mixture B into mixture A. Blend well.

7) Pour into the sponge cake baking pan.

8) Put to bake in preheated oven at 150 Celsius for 35 minutes.

9) When cake is done, turn it up side down as shown in pic. 8.

Note: A successful sponge cake is, of course, SPONGY! Wow! I'm so proud of myself. =)
To be frank, even breaking the eggs are tough for me because I just can't get it right separating the whites from the yolks!

Wednesday, April 27, 2011

Steamed egg cake

This is another recipe from my sis-in-Christ, Hooi Thiam.

Pictures show process (clockwise).

Ingredients:
2 eggs
4 tablespoon of sugar
9 tablespoon of plain flour
1/2 tablespoon of vegetable oil

1) Beat the eggs with the sugar until fluffy. It's gonna take some time and it really ache the arms (for me).

2) See pic. 2. When you bring up the whisk, the mixture is slightly 'foamy' and not watery. Then, it's considered done.

3) Add in flour and oil and mix well.

4) Pour mixture into a pan and steam over boiling water for 20 minutes.

The outcome should be a spongy egg cake. The texture of the cake is not too hard or dry. My mom said that using machine to beat the eggs will cause the cake to be hard and dry. =(
So, have to do it by hands and don't rely on the machine. (Psst! That's the secret to strong arms - lots of practice on beating the eggs, carrying the baby and heavy groceries).

NOTE: I used organic unbleached bread flour to make mine cos I'm giving it to my son as finger food.

Wednesday, April 20, 2011

Pandan cheese balls

You are going to like the food and the process of baking itself. It is so easy, you wanna try it NOW! Pictures showing process (clockwise from top left).


Ingredients:
1 egg
1 tablespoon of corn oil
4 tablespoon of thick pandan juice
4 tablespoon of mozzarella cheese
1/2 teaspoon sugar
1/3 teaspoon salt
10 tablespoon of tapioca flour (150g)


1) Put everything into the blender and blend till smooth.
2) Grease the muffin tins.
3) Fill up the muffin tins with the mixture.
4) Bake at 200 degree Celcius for 15 minutes or when bread turn slightly brown.

Monday, April 18, 2011

Onde-onde kuih

This is going to be exhausting but trust me, you're going to enjoy the process. It's best if you have a partner to do it together. Otherwise, get a chair and start rolling the balls!

Pictures show process (clockwise from top left)

Ingredients (makes 30):


For Onde-onde skin:
240g glutinous rice flour
8 tablespoon of thick pandan juice
120ml hot water
1 tablespoon of oil
2 tablespoon brown sugar

Filling:
1/2 piece of gula melaka (grated)

Coating:
1 grated coconut
1/2 teaspoon of salt

1) Put all the ingredients together and mix well. It will form a soft dough. If it is too dry, add drops of pandan juice and knead again until you get a soft dough without any cracks.
2) Cut the gula melaka into small pieces. (I tried cutting it but it is too hard for me. So, I chose to grate it).
3) Pinch a small dough and flatten it (around 2 x 2 inches). Put a little of gula melaka and seal up. Roll up as a small ball.
4) Put all the balls into a pot of boiling water. Wait till the balls float up. Drain the balls and roll them over with the grated coconut.

Enjoy!

Note: To know how to get pandan juice, read the post dated 18 April 2011.

How to get pandan juice

Buy at least 10 pandan leaves.

1) Wash and cut the leaves into 2 inches in length.
2) Put everything to the blender. Add in 1/2 glass of water and blend well.
3) Strain the juices after blending.
4) Get a clean cloth and put the remaining pandan pulp into it and squeeze till it dries up.

NOTE: You will have roughly around 3 to 4 tablespoon of thick pandan juice.

Thursday, April 14, 2011

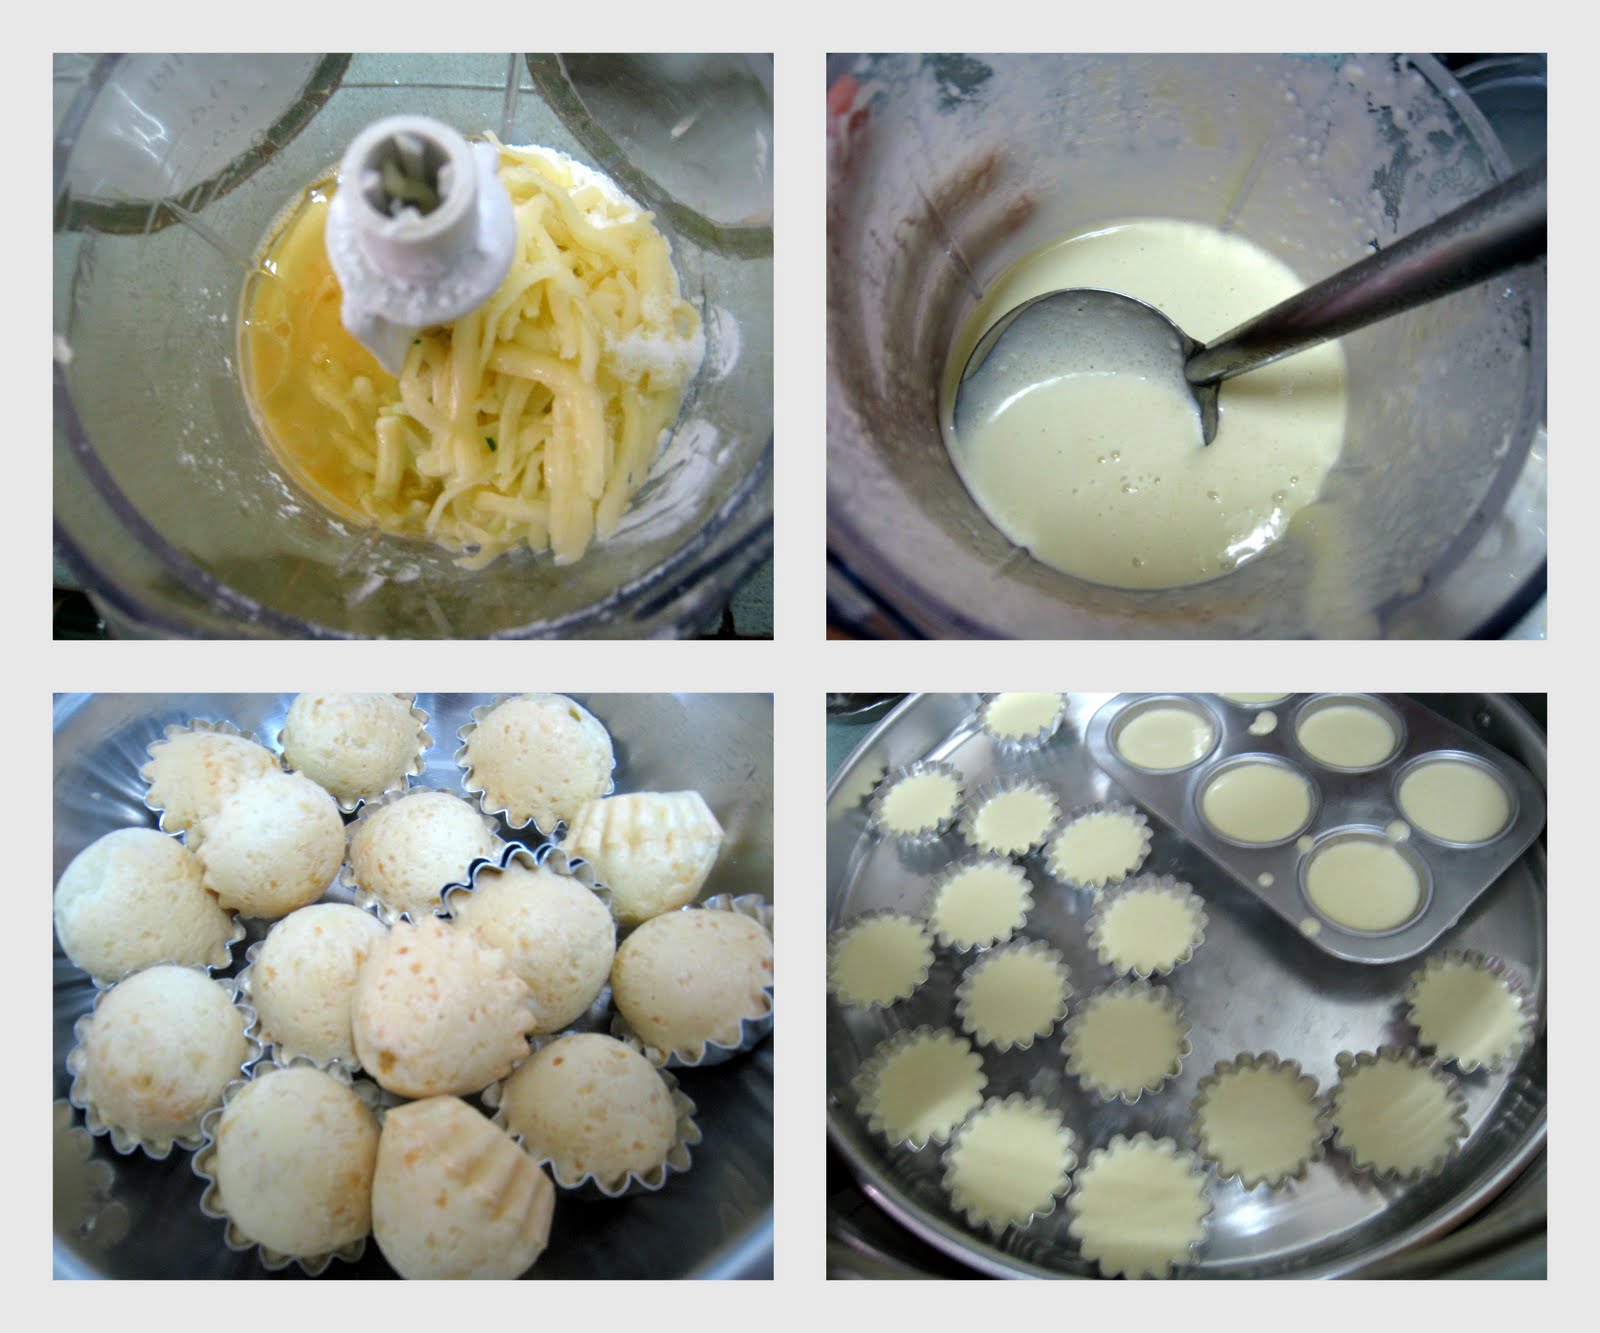
Brazilian cheese bread

This is as easy as it looks.

Pictures showing process (left to right)
Ingredients:
30ml vegetable oil
60ml milk
150g tapioca flour
60g mozzarella cheese
1 egg
1/2 teaspoon of salt

1) Put all the ingredients into the blender and blend well. You will have a creamy texture after the blend (just like what you see in pic.3)
2) Grease muffin tins.
3) Pour the ingredients into the muffin tins.
4) Bake at 200 degree Celcius for 20 minutes.

NOTE: Don't worry when you see the mixture start to swell up. They will turn into brownish cheese balls!
Mine are a little too brown. I think they will look better if taken out when it is just SLIGHTLY brown.
Try this! It's for beginners.

Thursday, April 7, 2011

Tuna Pizza

I long to eat pizza for a long time but due to the price, I rather eat in Chinese restaurant than spending the same amount of money eating 'bread'!

Baking pizza is just like baking bread. It takes hours to finish the job.


Unlike pizza restaurant where they have the dough ready, baking at home starts from mixing the ingredients.

Pictures showing process (Clockwise from top left)

Ingredients for one personal pizza (diameter approximately 6 inches)
125gram of plain flour
1 teaspoon of sugar
1/2 teaspoon of yeast
1/2 tablespoon of butter
12.5ml vegetable oil
50ml chilled milk
1/8 teaspoon salt

Filling:
1 onion (cut into small slices)
1 small piece of pineapple (cut into small cubes)
1 can of tuna
1 handful of mozarella cheese


1) Mix all the ingredients in a mixing bowl. Cover the bowl and let dough to rise for 40 minutes.
2) Punch the dough to release gas. Knead for 5 minutes and cover the bowl again to let the dough rise for 50 minutes.
3) Punch the dough to release gas. Roll out the dough into the desired size (fit into a pan with diameter 6 inches)
4) Pierce the base with a fork and bake at 180 degree Celcius for 10 minutes.
5) Add in the filling - onions, tuna, pineapple. Finally, sprinkle mozarella cheese on top.
6) Bake at 200 degree Celcius for 15 minutes or until the sides turn golden.


Note: The base should not be too thin. Otherwise, it is not strong enough to support the filling.
My tuna doesn't taste that nice. Better to get people's opinion on which brand of tuna to buy the next time. Till then, happy pizza-ing!

Wednesday, April 6, 2011

Maize meal raisin bread

Unlike cookies and scones, bread takes hours to be done. That is one of the reasons I am late to add in a post today.

Photos (left to right; top to bottom) shows process.


 Ingredients:
250gram plain flour
 50gram maize meal
130ml water
30ml vegetable oil / olive oil
2 tablespoon molasses sugar / plain sugar
1/2 teaspoon salt
2 teaspoon instant yeast
2 tablespoon raisins (chopped coarsely)

1) Put all the ingredients together in a mixing bowl. Add salt at one corner, far from the yeast.
2) Blend with the mixer. The hook should come out clean.
3) Cover the dough and let to rise for 35 minutes.
4) Punch the dough to release the gas. Knead for 5-10minutes. Then, cover the dough again and let to rise for 45 minutes.
5) Punch the dough to release the gas. Knead for 5-10minutes. Add in chopped raisin and fold in. Then, cover the dough again and let to rise for 50 minutes.
6) Bake at 150 degree Celsius for 35 minutes.

Happy baking!

Note: My bread is slightly brown due to the Molasses sugar.

Thursday, March 31, 2011

Why did your tarts fail?

Every little things count in baking. 

1) Baking Oven
Yes, I followed exactly what the recipe said but the temperature from a microwave oven with convection is different from the antique oven passed on by my mother. I wondered why but it's the truth.

2) Moulds
There are so many different moulds in the market. The one I mentioned in my previous blog uses a BIG mould. If you have small ones, then, you are able to produce 6 tarts instead of 4.

3) Measurement
Buy good measuring spoons for solid / liquid and mugs for liquid. You need to LEVEL the ingredients (scrap off the heap-up amount) unless mentioned otherwise.

4) Sugar
Use castor sugar for baking stuffs. Coarse sugar cannot be melt easily and will remain in solid form even after baking causing one part of tart to be sweeter than the other.

5) Eggs
Keep eggs in the refrigerator so that they can stay fresh

6) Flour
Different types of flour will make your tarts to have different texture. Organic flour will have a stronger texture compared to normal plain flour.

7) Monitoring
Whatever the recipes say, monitor your product. When you see the filling has already turn slightly brown, check whether it is cooked. If it is, stop baking it even before the time is up. Don't wait just because the recipe says so. Mine were burnt because I left them to the oven and gone to feed my son.

To check on the filling whether it is cooked, do the Toothpick test. Poke a toothpick through the filling and if the toothpick can stand by itself, then it is cooked.

At the moment I could only think of the above. If you do know of any others, kindly let me know so that I can share them.

So, let's get going. If I can have successful tarts in my second attempt, so you can do even better with the tips!

Egg tarts

This is my second attempt at baking tarts. To beginners, they are not as difficult as they seem. So, you gotta try baking them to get the kick of it! Photos show process (top left; clockwise)

Ingredients for 4 pieces:

For PASTRY
8 tablespoon of plain flour
1 tablespoon of castor sugar
2 tablespoon of butter
1 tablespoon of water

For FILLING
4 tablespoon of milk
1 egg
1 tablespoon of castor sugar

1) Mix the ingredients for PASTRY in a large bowl with a mixer or whisk.
2) Roll it into a big dough. Then, separate the dough into 4 balls.
3) Press the balls into the moulds.
4) Put to oven to bake for 5 minutes at 180 degree Celsius.
5) At the meantime, mix the ingredients for FILLING.
6) Use a ladle to fill into the pastry.
7) Bake for 10 minutes at 150 degree Celsius.
8) Take out and cool for 5 minutes before removing from the moulds.

Wednesday, March 30, 2011

Raisin Scones

This is extremely easy. Beginners will get motivated after the first baking and will want to do it again and again. Pictures (clockwise) show process.

Ingredients for 8 pieces:

A
8 tablespoon of flour
3 tablespoon of butter
3 tablespoon of milk or 1 egg
2 tablespoon of castor sugar

B
1 tablespoon of raisins (chopped)
2 slices of orange peel (chopped into very tiny pieces)

1) Mix ingredients A with a mixer. A good dough is smooth and soft with the faintest sticky feel.

2) Add in ingredient B and mix well.

3) Scoop out the dough into a pan.

4) Bake in the oven at 170 Celsius for 20 minutes.

5) Take out and cool them before eating.

Happy trying!

Saturday, March 26, 2011

Making bread with breadmaker

I was so excited when I saw a breadmaker in Tesco yesterday. Well, don't think I'm so "sua ku" (mountain girl) who knows not about breadmaker. It's the price that excite me. It's only RM189!

My friend bought one which cost RM800 and another one bought for RM400. So, something below RM200 is considered cheap.

Nevertheless, I stood there for whole 10 minutes, contemplating whether to purchase it. To be frank, I'm one of those 'kiam siap' person who would not spend on material things.

Long story cut short, I told my husband and he bought it for me. So, I have a brand new breadmaker.

I've never used a breadmaker to bake bread before. Hmm...

According to the breadmaker manual, it is best to put the liquid ingredient first. Then, add in salt. Yeast should be added last. Then, all I have to do was to press the buttons and the machine started to knead the ingredients into a dough. After almost 3 hours, the bread is ready.

For those without a breadmaker, I'll give a detailed procedure on how to bake a bread in the coming post. I'm not a 'si fu' in baking bread but just wanted to share to the last bits of what I know. For those with a breadmaker, happy baking!
Posted by Picasa

Friday, March 25, 2011

Baking and Cooking

I am quite concern with what my son or the family takes.

There are just too many processed food out there which might kill you if you eat them often enough.

Take baking for example. I don't understand why recipes have to include baking soda, baking powder, shortening, bread softener, etc. etc.? Think of our forefathers when all these things don't exist yet, they could still bake. So, we gotta go back to basic and find a better solution to baking rather than taking the easy way out.

My friend, Hooi Thiam, really goes a distance for whatever she bakes or cooks. She has many books on baking yet she still experiment till she got the right ingredients for her cakes and cookies.

Why?

For the sake of her whole family's health.

That's what I learned from her and am doing too...

What Hooi Thiam noticed was that, breads and cookies selling in the market used 'vegetable oil' or in another word, marjerine. If one really goes into this, marjerine contains trans fat which harms the body.

But why people use marjerine to bake? Firstly, it is cheaper than butter. Secondly, society has the misconception that vegetable oil has lesser fat and thus, a smaller chance to get plump. Google the difference between marjerine and butter and you'll gonna be surprised!

Next, let's talk about eggs. Eggs have to be kept in the fridge. Otherwise they will not stay fresh. You will know it when you break the egg into a bowl. If the yolk stay put, very beautifully in a round shape, then that egg is extremely fresh.

I don't really use sauces much. Come check my kitchen and you'll find that I don't even have osyter sauce! Wow! Man do I like osyter sauce...But for the sake of health, I denied my own desire to buy one. Frankly, if food can taste good without that, why bother to have it?

I'm quite paranoid with all these processed food. Whenever I buy something, I always look at the ingredients. When I find that there are so many artificial ingredients, I gulped and think of how much of work I've been putting my liver to. Liver is one of our main organs which washes out our toxins and should be taken care of. So, why burden your liver when you can let it rest?

The next time you wanted something 'complicated', imagine yourself putting lots and lots of rubbish into your stomach. You will eventually walk away without them...

I don't suggest that you can't pamper yourself at times for processed food. A single piece of potato chips and a few pieces of cookies would not harm much right?

Anyway, if our forefathers can cook delicious meals just with simple ingredients: salt and sugar, so do we. Let's eat healthily and happily.
Posted by Picasa

Wednesday, March 23, 2011

Yam Cake

My friend, Hooi Thiam, likes to make Yam Cake for her family for breakfast. She thinks that it is much healthier than eating processed cereals.

Thanks to Hooi Thiam for this recipe.

Well, if you want to make this, then, you've gotta be very hardworking. It takes a lot of work to prepare this dish. Unless you have someone who appreciates the food, you might as well forget about making it.

My mom always says, buy a few pieces of it to satisfy the taste buds is so much easier than cooking it by yourself.

A good yam cake depends very much on the yam itself. And so, each time the taste of a yam cake that you bake might differ slightly due to the texture of the yam.

I have this honest vege seller, Rabbit Teeth Aunty. She will choose the best yam in her store for me. A good yam is 'powdery'. The knife will have white liquid on it as shown in picture no. 3.

Pictures showing process (top left to right)

The main ingredients are:
1) 1/2 yam
2) one large onion
3) 3 tablespoons dried shrimps
4) 250 gram of blended rice flour (1/2 packet)
5) 1 teaspoon salt
6) 1 teaspoon sugar
7) 125ml + 750ml of water (put separately)

My friend says that you can add in other ingredients such as sweet potatoes, lap cheong (preserved wax meat) or even minced pork. Trust me, I tried that and it's so delicious!

1) Cut the yam into cubes
2) Chop the dried shrimps coarsely
3) Slice the onion
4) Add the salt and sugar to the flour and mix well with 750ml of water. Strain the mixture.
5) Fry the onion till fragrant. Add in dried shrimps.
6) Add in yam. Then, add in 125ml of water. Keep frying till the yam absorb most of the water.
7) Add in the flour mixture in 3 stages. Pour in the mixture and fry till sticky. Don't panic here. It is meant to be dry and sticky. Add in more flour mixture and keep stirring.
8) Turn off the heat and scoop out the mixture into a big bowl.
9) Put to steam above boiling water for 30 minutes.
10) The cooked yam cake needs about 1 and a half hour to totally dry up. So don't get panic when you see the finished product which is quite wet the moment it comes out of the pot.

You can keep the unfinished yam cake in refrigerator and steam it again the next day before eating. The yam cake can be kept for 3 to 4 days before it turns mouldy.
My friend goes a distance for her yam cake - she blended her own rice to be made flour! So, her yam cake can only last for 1 to 2 days. The logic is that - the blended rice flour we bought from the market contained preservatives to keep it fresh. At the moment, I opted the easier way out, the ready blended rice flour! What about you?

Do enjoy the process!
Posted by Picasa

LinkWithin

Related Posts Plugin for WordPress, Blogger...

Nuffnang ads